Arch Linux — close encounters of the third kind

Have you ever wondered about installing Arch in your system? I’ll give you the answer: yes! — that’s why you are here probably, but in case you are not here for installing Arch, keep reading, you are welcome!
Well, it’s not so complicated as many people could think, even if it may be frustrating, I am going to illustrate you my own way to install it among your primary operating system.
But first let me give a little bit of context: I am used to use Windows just for some tasks and use Linux for every other task that are not heavy on the RAM and CPU load (gaming, video editor and all these kind of stuff).
Many of you perfectly know that the perfect Linux version doesn’t exist: each of uses its own distro, usually novices go for Ubuntu.
Personally I really like to experience new things: for this reason I tend to change my main Linux distro every time I get bored of it.
Is it matter of WM? Is it matter of DE?
Well, this is another story I’d love to tell you another time, let’s start!
For short, my current configuration is the canonical “Windows in the first partition and Linux in the second one” even if I use Linux more than Windows, we will later discuss this point.
Premise
Although this was my first attempt to install pure Arch Linux, I would definitely not suggest to install this distribution if you do not have some familiarity with the Arch’s world.
Make sure to try first some distros (more on www.distrowatch.com), familiarize with packets and aur, and most importantly: with bash and the Linux hierarchy filesystem.
You don’t need to be Linus Torvalds in person to be good: just study the fundamentals. With Arch, you either know what you are doing or you are doing it wrong.
But wait, there is more: during all our journey, we are going to use the Arch Wiki, known as “The Holy Arch Linux Bible” (reachable at: https://wiki.archlinux.org/index.php/).
Why — as you may think — is it so important? Because here you can find almost everything you need: how a program works on Arch, how to setup and, my favorite part, troubleshooting to the most common issues.
Material Needed
You will need in general:
- an insane amount of patience
- time, I spent countless hours to setup everything. You will need several hours (or maybe even days) to figure out how to solve a problem or setup a specific thing. I warned you!
- music: not mandatory, but highly motivating; feel free to listen to whatever you like most
- an internet connection
- a computer capable of running Linux. And yes, I am telling you on purpose because some old CPUs do not support Linux.
- a secondary device to consult the Holy Arch Bible — https://wiki.archlinux.org/index.php/
- a bootable media with Arch Linux
- two empty partitions, ~80gb and ~16gb respectively
- cup of coffee, biscuits, whatever; you need to celebrate at the end of this!
I won’t cover how to create a bootable media, I assume you already know a little bit how to do it. If not, search it on your favorite search engine.
In my specific configuration I used a computer with a nvidia graphic card and a UEFI bios. No jokes on the graphic card please!
Baby Steps
Let’s reboot our computer again; after a little bit of waiting: here it is! The glorious terminal screen! Do you feel omnipotent? Don’t worry, it will pass it over very soon.
Let’s start: first of all, we need to setup our keyboard layout!
By default is set to US, I am fine with it so we are not going to change, but in case you need to change it, you could could see all your locales installed with
localectl list-keymaps
and to select the one you prefer you will need to write in the terminal
loadkeys choosen_keymap
Boom, now you have your favourite keyboard set up!
Get connected to the Internet
Now, you will need to connect to your Internet. You can follow the wiki to understand more on what you need to do, but I will show the WiFi process in brief here, as I used that.
Start iwctl by typing iwctl in the terminal then:
[iwd]# device list
[iwd]# station _device_ scan
[iwd]# station _device_ get-networks
iwctl --passphrase _passphrase_ station _device_ connect _SSID_
Aaaand, you are connected to the Internet! You can test your connection by typing ping url or simply skip it.
In my personal case, with ping command there were a packet loss, but it was “fake” because the connection was working. But this is just the point of iceberg…
On time
It’s never too late to be on time in advance, and that’s what are we going to do. Just let’s synchronize our time with ntp protocol using:
timedatectl set-ntp true
Preparing our partitions — eventually by formatting them
Here we are again: another important extreme step that you carefully need to follow with extra attention: mounting partitions.
You have no idea how many times in my life I messed up with my computer by choosing the wrong partition, overwriting EFI and Windows partition, please be careful here!
Let’s give lsblk in the terminal, we will see a list with our devices.
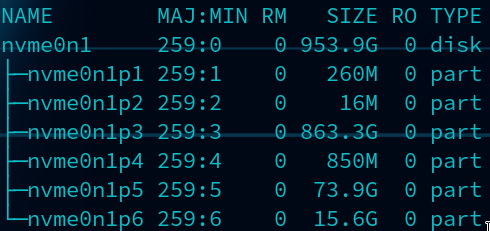
Here it is what it looks like mine, to give you an idea
In my case the partitions are named nvme0n1p5 and nvme0n1p6 which we are going to call to simplify their names, p5 and p6 . The first one is used to store my operating system and all my files, the second one is used for swap.
There is another partition too: p1, which is just a simple partition with around 300mb. This is typically used as EFI partition, and it is used to boot our computer.
Note: your disks or your partitions may be named differently! Check twice! Better safe than sorry!
I figured out p5 and p6 were my desidered partitions so with mkfs.ext4 /dev/nvme0n1p5 I formatted that partition in ext4 partition and with mkswap /dev/nvme0n1p6 I created swap space.
Let’s enable it by typing: swapon /dev/nvme0n1p6
Mounting
Now, things are becoming interesting: I mounted my partitions by typing mount /dev/nvme0n1p5 /mnt created a new folder in /mnt called efi and mounted p1 in this new folder mount /dev/nvme0n1p1 /mnt/efi
Photo by Mick Haupt on Unsplash
Pacman
Do you know what Pacman is right? For short: Pacman is the Arch’s packet manager, you are going to use it to install your packages.
Let’s update its mirror list!
reflector -c yourcountry -a 24 --sort rate --save /etc/pacman.d/mirrorlist
Now that pacman is updated, let’s install everything. In my case several packages are needed:
pacstrap /mnt base linux linux-firmware dialog dhcpd ifplugd efibootmgr os-prober grub wpa_supplicant nano
If you want to know more about my configuration you could browse…
Now let’s talk about fstab: it contains the necessary information to automate the process of mounting partitions
Let’s generate our fstab:genfstab -U /mnt >> /mnt/etc/fstab and change our root directory arch-chroot /mnt
Timezone and locale
It is all matter of time, let’s set your timezone and update the clock:ln -sf /usr/share/zoneinfo/CET /etc/localtime and hwclock --systohc
Let’s setup our locale: since we have installed nano, we could modify our files using nano: nano /etc/locale.gen and uncomment the desidered line. I like to keep the locale in English, so I uncommented the en_US.UTF-8 UTF-8
locale-gen should do the magic now, and let’s edit another file called /etc/locale.conf : here I specified what I selected before by calling nano /etc/locale.conf , typing LANG=en_US.UTF-8 and saving.
Is it over?
Indeed: we are almost done.
Let’s create our /etc/hostname by writing inside it our desired hostname and saving.
We should modify even hosts file: nano /etc/hosts and add
127.0.0.1    localhost
::1          localhost
127.0.0.1    hostnameyouchose.localdomain    hostnameyouchose
Don’t forget to add our user to audio,video groups! If you wish you could add it to wheel too. The command would be something like: useradd -G wheel,audio,video -m usernameofthenewuser
Let’s setup a password with the passwd command: passwd usernameofthenewuser
We have done! Let’s install Grub to our p1 partition by typing:
grub-install --target=x86_64-efi --efi-directory=/efi/ --bootloader-id=GRUBgrub-mkconfig -o /boot/grub/grub.cfg
Now go grab that cup of coffee or eats some biscuits, it’s over! 🥳
If you liked this article, why don’t you take a peek at my Medium profile or check my Github?